Digital modes (Windows)
Connecting digital mode applications to Web Radio Control
You need to have wrc-proxy helper application and the virtual audio cable installed before you can proceed with these steps.
See the page
Initial setup for using digital modes in Windows
for installation instructions.
-
Open the Web Radio Control remote control user interface
-
Open the
Settingswindows and select theHamlib proxytab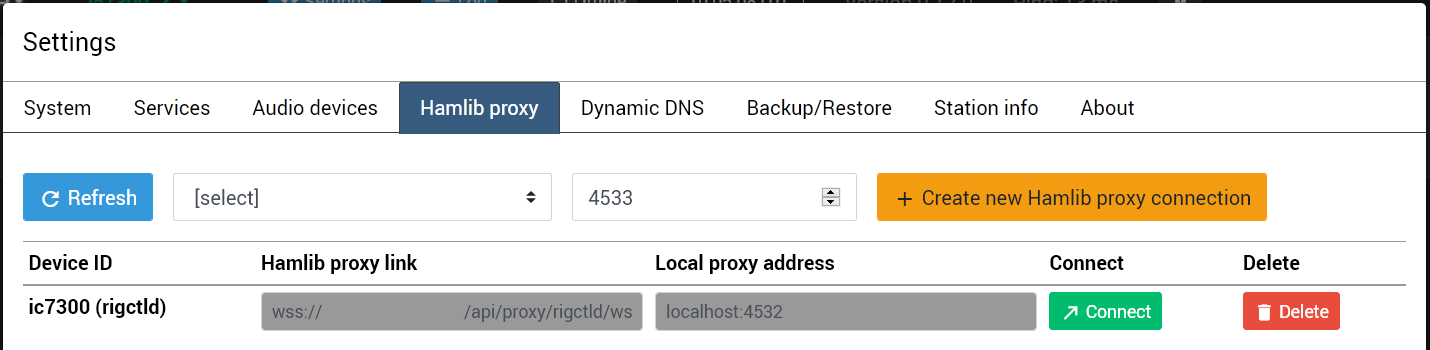
-
If the list of proxy URL addresses already contains the radio, which you wish to use, skip to step 5
-
Create a new proxy URL address
-
Select the radio you wish to control from the
[select]drop-down menu -
Click
Create new Hamlib proxy connection for
-
-
Click the
Connectbutton next to the proxy address URL of the radio you wish to use to start thewrc-proxyhelper application-
Use the
wrc-proxyapplication to open the wrc-proxy link in the web browsers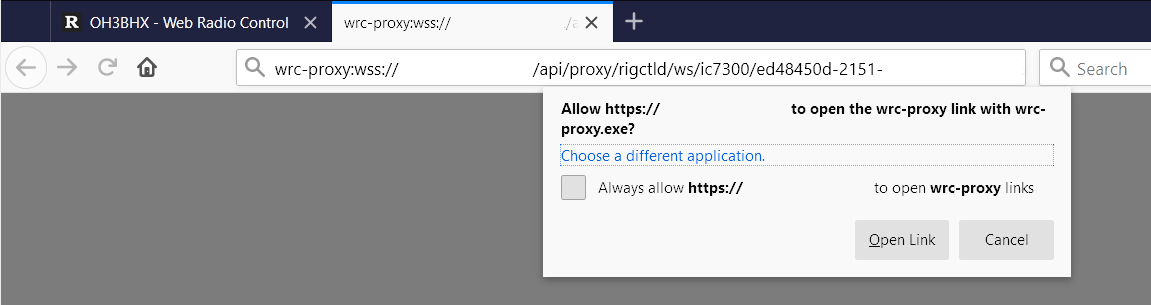
-
The
wrc-proxyhelper application will start up in a Command Prompt window. Leave thewrc-proxyhelper application running in the background.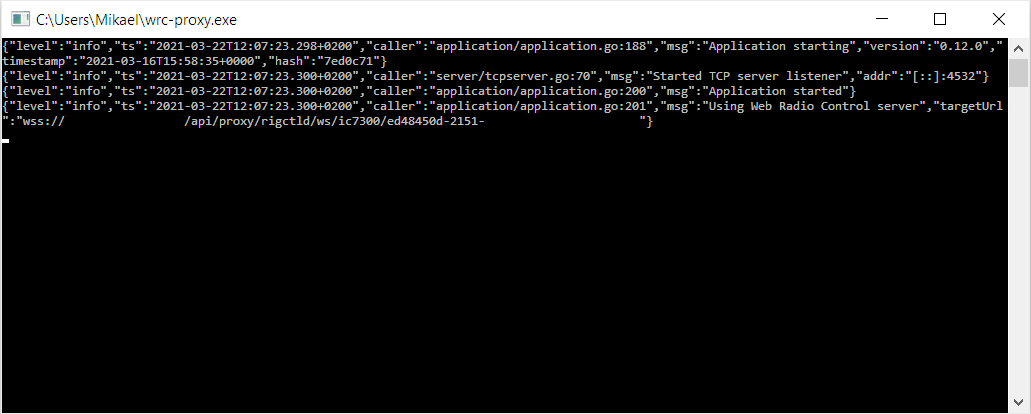
-
-
Start the digital mode application you wish to use (e.g. WSJT-X or fldigi).
-
Configure the digital mode application for Hamlib NET / rigctld protocol and use the address
localhost:4532-
There are detailed instructions below for connecting WJST-X to Web Radio Control
-
-
Route audio between browser and the digital mode application with a virtual audio cable / loopback sound card. Read below for instructions for your operating system.
-
There are detailed instructions below for connecting WJST-X to Web Radio Control
-
You can monitor the audio signal transmitted by a digital mode application in Web Radio Control user interface
by clicking Show audio and TX audio. This is how you can make sure that the audio signal is properly
transferred between the web browser and the digital mode application.
Radio settings for digital modes
Most digital transmission modes require that the radio transmits the audio signal produced by the digital mode application as clean as possible, without the radio processing on altering the audio signal in any way.
To disable audio processing in a radio transceiver, all speech compression, auto-gain control and noise reduction features must be turned off.
The instructions below indicate recommended radio settings for running digital modes:
-
Open the sidebar for radio settings in the Web Radio Control user interface
-
Apply the following settings in the
RFsubmenu:-
RF POWER=10 - 100%- many digital modes do not require using full RF power -
RF GAIN=100% -
AGC=OFF, theFASTchoice may also work well if theOFFchoice is not available -
PREAMP=0db -
ATTENUATOR=0db
-
-
Apply the following settings in the
RX audiosubmenu:-
NOISE BLANKER=off -
NOISE REDUCTION=off -
AUTO NOTCH FILTER=off -
MANUAL NOTCH=off
-
-
Apply the following settings in the
TX audiosubmenu:-
MICROPHONE GAIN=50%- this may also affect transmit power, too much gain can distort the transmitted audio signal -
SPEECH COMPRESSOR=off -
VOX=off
-
Routing the audio signal between the web browser and the digital mode application
You will need to perform this routing procedure for audio signals between the web browser and the digital mode application every time you use the digital mode application.
-
Start two-way (full duplex) audio streaming in Web Radio Control user interface by clicking the "Play" button
-
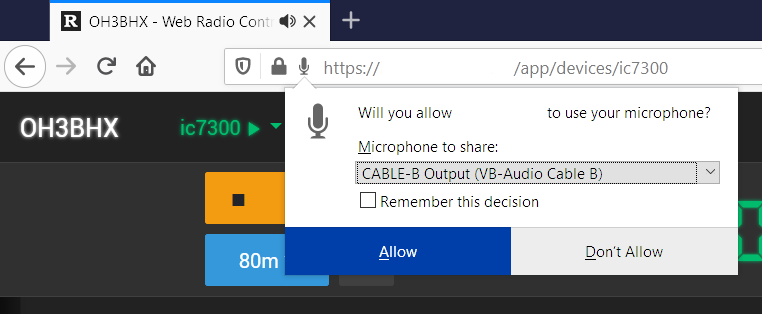
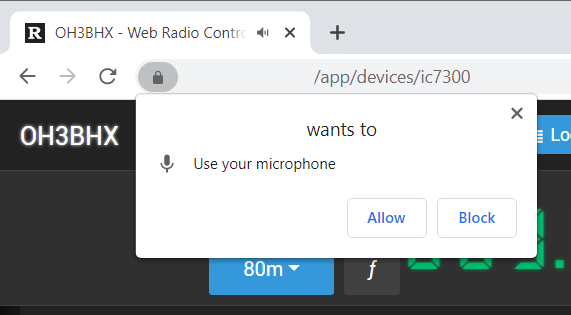
Allow the web browser to use your microphone. When using Firefox, you must also choose the audio input used for transmitting audio. Choose
CABLE-B Output. The Chrome web browser does not ask you to select any audio input specifically. *NOTE! If the web browser does not ask permission to use a microphone, the choice to use a microphone may be stored in the web browser. You must remove this choice with Firefox. The sectionthe web browser does not ask for permission to use the microphonebelow contains instructions on how to do this. Return back to this step after removing the microphone choice.-
Firefox:
-
Chrome:
-
-
Open the settings for audio devices in
Control Panel > Soundin order to set the operating system default speaker and microphone devices to use the virtual audio cable -
Select device
CABLE-A Inputin thePlaybacktab and click theSet Defaultbutton, which will route audio output from the web browser to the virtual audio cable A.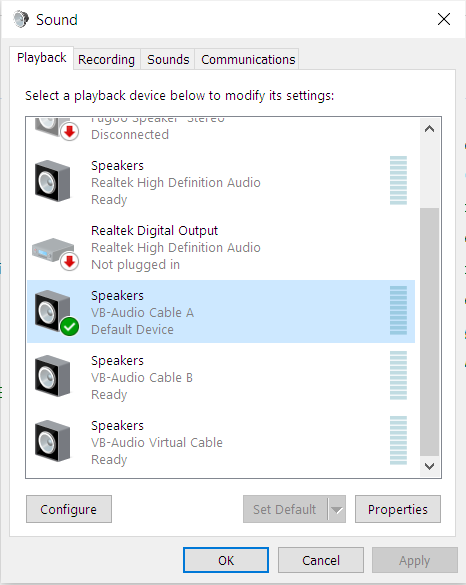
-
Select device
CABLE-B Outputin theRecordingtab and click theSet Defaultbutton, which will make the web browser receive audio from the virtual audio cable B.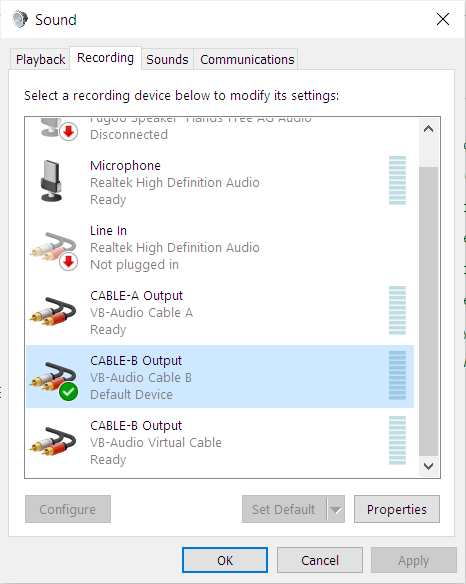
-
In the digital mode application (e.g. WSJT-X or fldigi), use the audio device
CABLE-A Outputas the audio input device and the audio deviceCABLE-B Inputas the audio output device.-
See below for more detailed instructions for setting up WSJT-X
-
Problem: the web browser does not ask for permission to use the microphone
Web browsers may save the permission to allow microphone access and the selected microphone permanently per website.
When using Firefox, it is necessary to remove this permission, so that it is possible to select another audio input
device as the microphone. Chrome does not save the audio input device for the microphone, so the audio input
selection needs to be done in the pavucontrol application and it’s not necessary to remove the permission
for using microphone in Chrome.
Removing automatic selection of microphone audio input device in Firefox:
-
Click the lock icon on the left side of the address bar
-
Remove the permission for the website to use microphone by clicking the cross icon
-
Refresh the page in the web browser

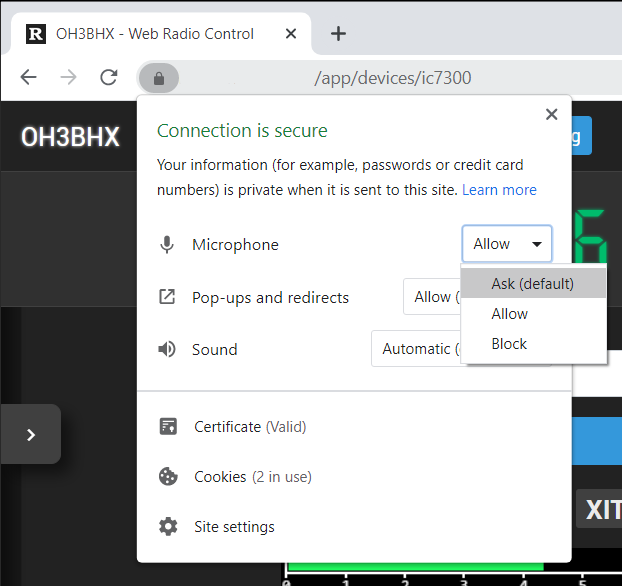
Removing saved permission to allow use of microphone in Chrome:
-
Click the lock icon on the left side of the address bar
-
Remove the permission for the website by selecting
Ask (default)on rowMicrophone -
Refresh the page in the web browser
Case: Connecting WSJT-X to Web Radio Control
You will need to have the wrc-proxy helper application installed and connected to Web Radio Control according
to the instructions above so that WSJT-X will be able to control the selected radio.
This section provides detailed instructions for connecting WSJT-X to Web Radio Control.
-
Open the WSJT-X application
-
Perform the following changes to radio control and audio settings
WSJT-X: Radio control and audio settings
-
Open the Settings window via menu
File > Settings… -
Select the
Radiotab -
Apply the following settings
-
Rig:
Hamlib NET rigctl -
Network server:
localhost:4532 -
PTT method:
CAT -
Mode:
Data/Pkt— This is the recommended settings if your radio supports DATA mode for SSB -
Split Operation:
Fake It
-
-
Click the
Test CATbutton and wait for the button to turn green, which indicates that the radio control connection is working -
Select the
Audiotab -
Select the audio input and output devices
-
Input:
CABLE-A Outputwith channel setting:Mono -
Output:
CABLE-B Inputwith channel setting:Mono
-
-
Close the
Settingswindow by clickingOK
Testing that the virtual audio cable works correctly
The digital mode applications should be able to process the received audio from the radio.
In WSJT-X, for example, the received audio should be visible in the WSJT-X audio waterfall spectrum and WSJT-X should be able to decode stations. If decoding is not working, check that the radio control works (e.g by changing the frequency band) and that the current frequency is correctly set for the digital mode in use. Verify also that the client computer clock is synchronized correctly, because many digital modes require the computer clock to be set very accurately.
You can monitor the audio signal transmitted by a digital mode application in Web Radio Control user interface
by clicking Show audio and TX audio. This is how you can make sure that the audio signal is properly
connected between the web browser and the digital mode application.
To verify that transmission works correctly in WSJT-X, for example, it is necessary to attempt a QSO with another
station or to use the WSPR beacon mode. When WSJT-X is transmitting audio, you should be able to see the
audio waterfall spectrum of the transmitted audio (usually a simple carrier wave) in the Web Radio Control
waterfall scope when TX audio is selected.