Network setup
These instructions document the settings and procedures required for configuring the local network router (or modem) and the domain name so that it is possible to access Web Radio Control from the public Internet.
In order to proceed with the instructions, you will need to have:
-
Web Radio Control installed on a Raspberry Pi computer
-
a working Internet connection that provides a public IP address (a static IP address is not required)
-
a router or a modem, which has a public IP address and provides access to the Internet from the local network
-
access to the management/configuration user interface of the router or modem (usually via a web browser)
-
the Raspberry Pi computer connected to the local network using a wired Ethernet connection
Verifying local network connectivity
The Web Radio Control software uses an automatically discoverable domain name webradiocontrol.local for the Raspberry Pi.
This domain name is accessible in the local network only. In some cases, the domain name may be simply webradiocontrol
depending on the router or modem configuration.
Verify network connectivity of the Raspberry Pi and the Web Radio Control software by pointing
your web browser to address http://webradiocontrol.local:8013/, which should open the setup user interface of Web Radio Control.
You can also check the Raspberry Pi IP address in the local network using the domain name webradiocontrol.local,
for example by running the following command-line command: ping webradiocontrol.local.
If the web browser displays the setup user interface (see the screenshot below),
the installation of Web Radio Control on the SD card has been successful and the Web Radio Control software
is ready to be configured. You can now move on to the section Creating port forwarding settings below.
The domain names ending .local may not work in older operating systems, such as Windows 7.
You can alternatively try using domain name webradiocontrol (without the .local suffix), or if
that name doesn’t work either, proceed to the section below that provides an alternative method for
verifying network connectivity.
The Web Radio Control setup user interface main screen:

Alternative: Verifying local network connectivity when the address webradiocontrol.local does not work
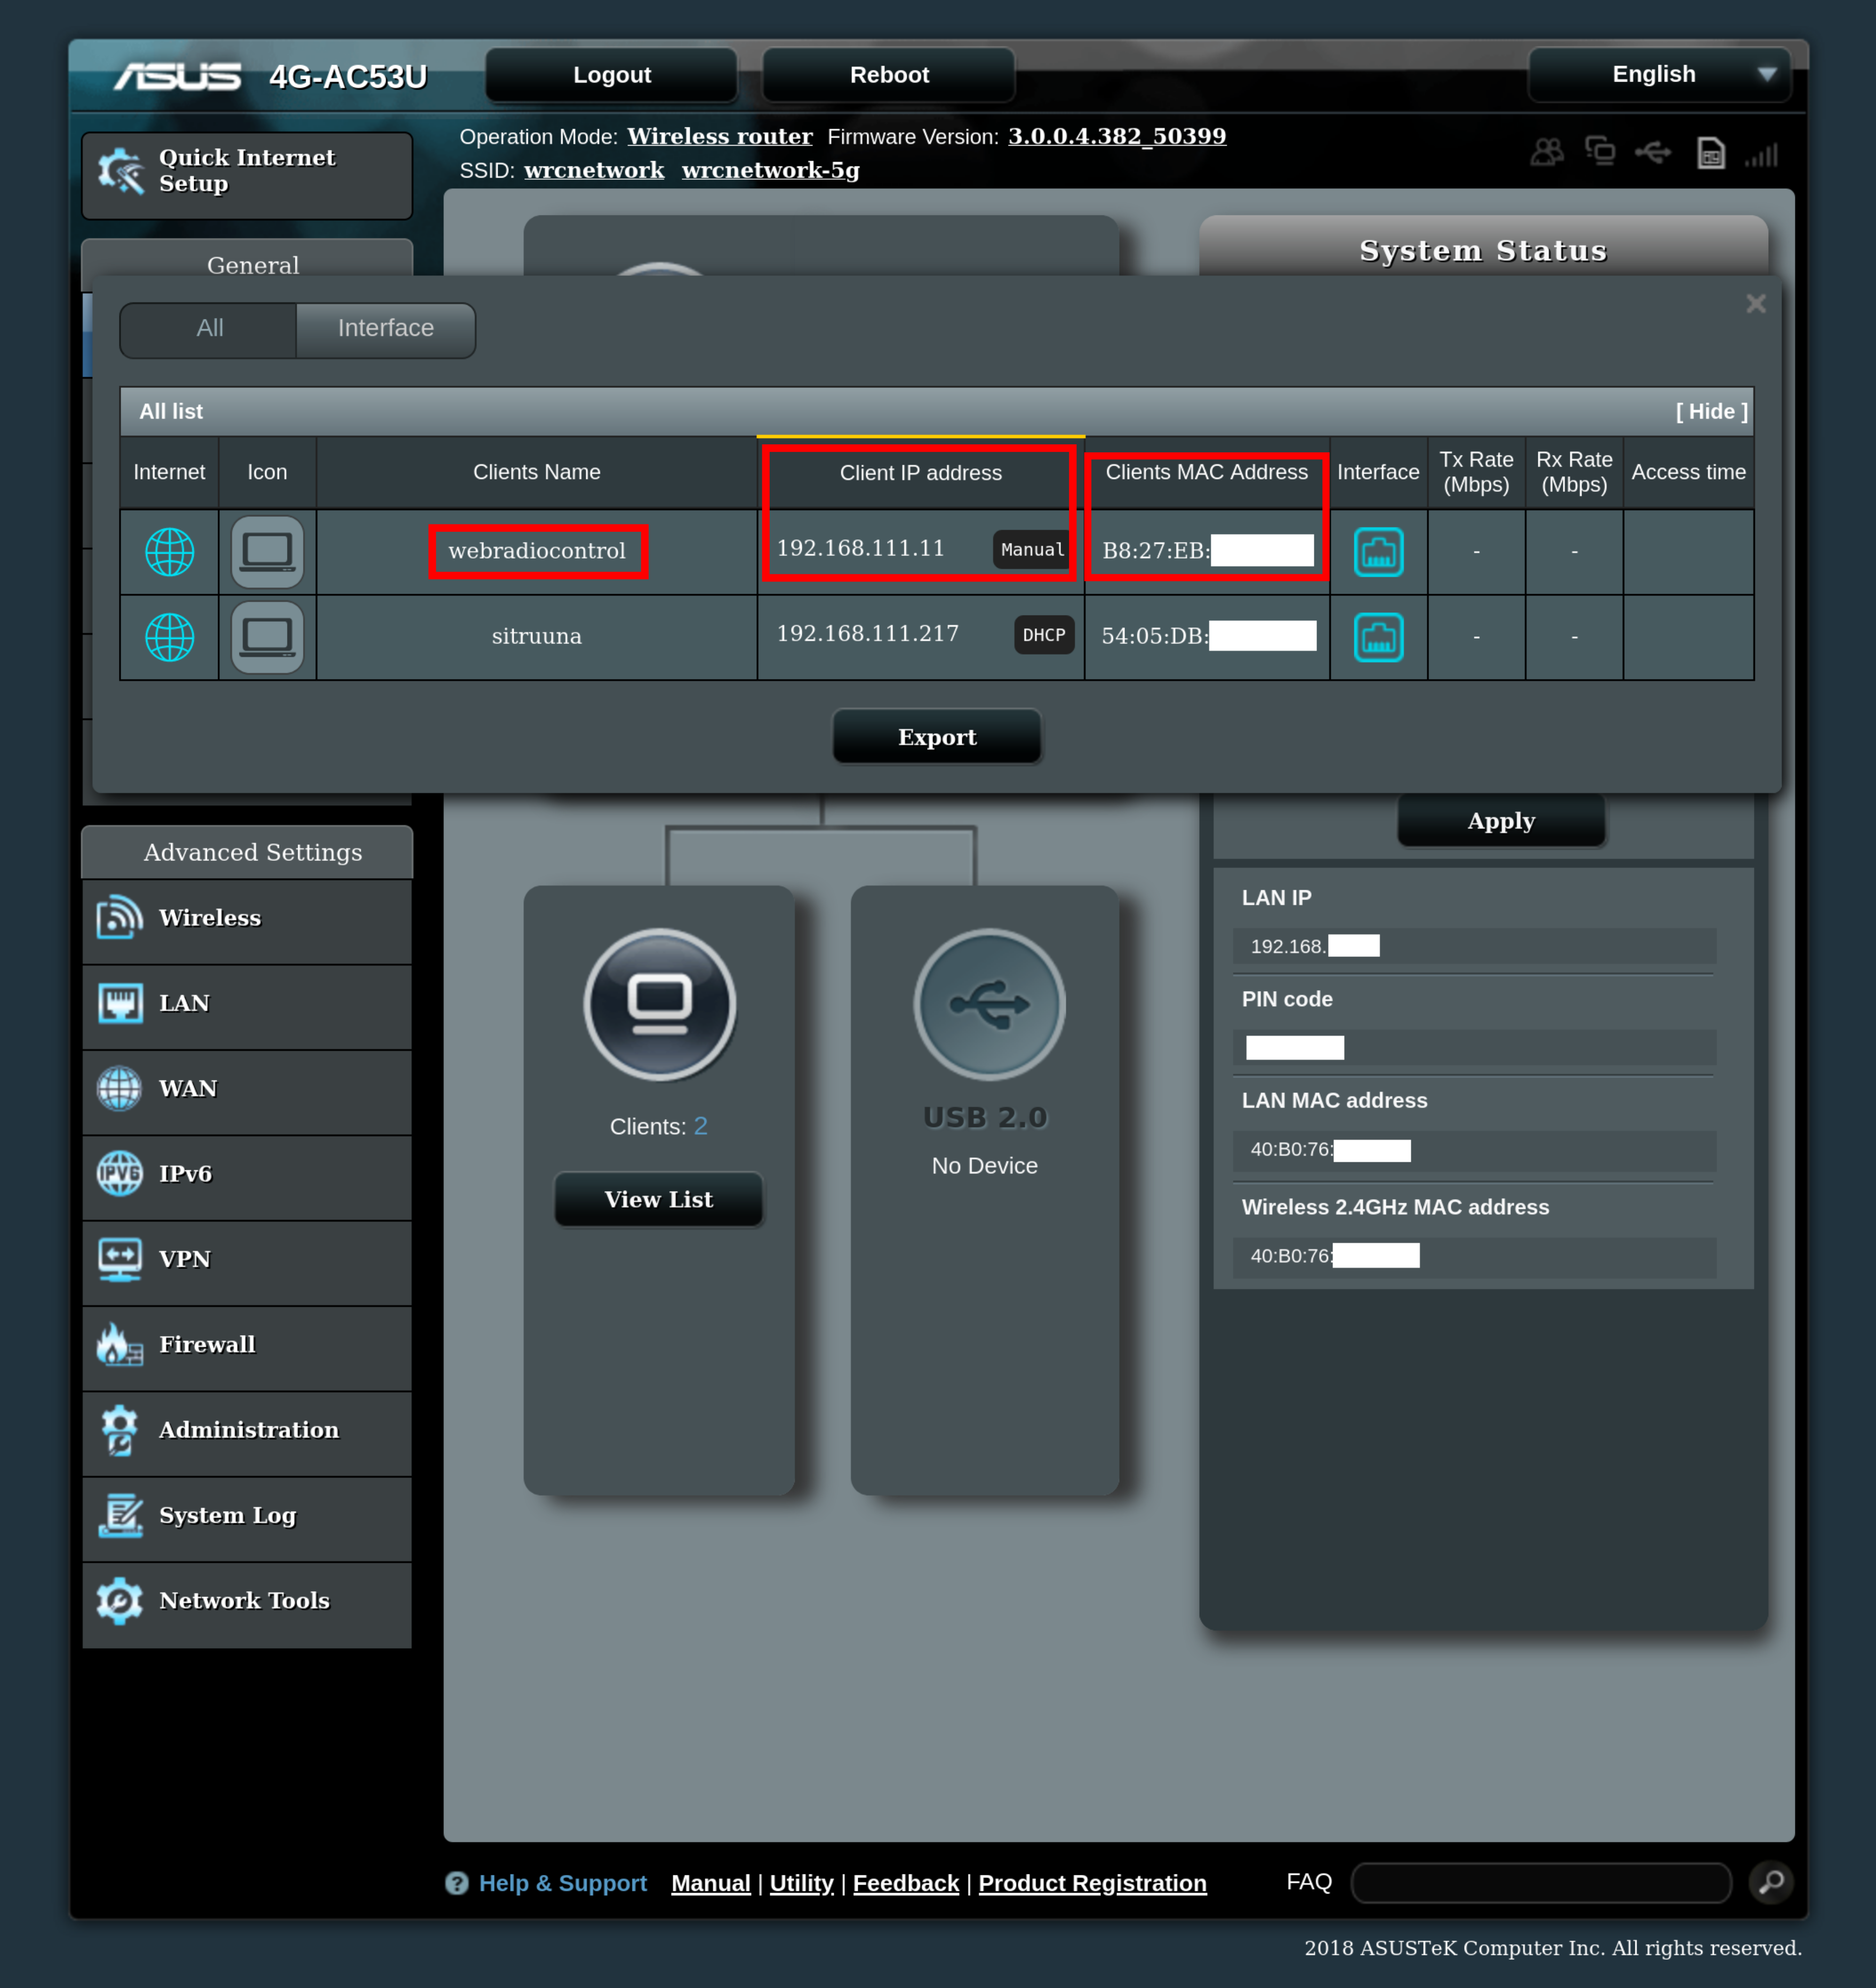
You can find out the IP addresses of devices connected to the local network using the management user interface of the router or modem providing Internet access in your local network.
-
Log in to the router/modem management user interface and find settings for the DHCP service
-
Please refer to the user manual of your router/modem on how to do this
-
-
Find the list of connected devices in your local network using the router/modem management user interface
-
Please refer to the user manual of your router/modem on how to do this
-
For additional information regarding finding connected devices, see: https://uk.pcmag.com/iphone-apps/116206/how-to-see-whos-on-your-wi-fi
-
-
Find the IP address that corresponds to the name
webradiocontrolin the list of connected devices. Most routers and modems list the domain names of devices in the local network in addition to the IP addresses. The domain name for the Raspberry Pi device running Web Radio Control iswebradiocontrol. -
Open a web browser and point it to address
http://IP-ADDRESS:8013/, whereIP-ADDRESSmust be replaced with the IP address you identified for Web Radio Control in the previous step. If the web browser displays the setup user interface, the installation of Web Radio Control on the SD card has been successful and the Web Radio Control software is ready to be configured. You can now move on to the section "Creating port forwarding settings" below.
Below is an example screenshot from Asus 4G modem management user interface for listing connected devices and their IP addresses:
Reserving a fixed IP address in the local network (DHCP reservation)
The Raspberry Pi computer will receive a dynamic (changing) IP address from the DHCP service running on the local network router or modem by default and this is also how the Web Radio Control software installation on the SD card works. In order to open access from public Internet to the Web Radio Control server, it is necessary to create port forwarding settings on the local network router/modem. Additionally, the port forwarding settings work properly only if the IP address of Raspberry Pi in the local network is fixed using a DHCP reservation.
It is mandatory to create the DHCP reservation to fix the IP address. A dynamic IP address (without a DHCP reservation) in the local network may change when the router/modem or the Raspberry Pi computer is power cycled, preventing the port forwarding settings from working correctly.
-
Log in to the router/modem management user interface and find settings for the DHCP service
-
Please refer to the user manual of your router/modem on how to do this
-
-
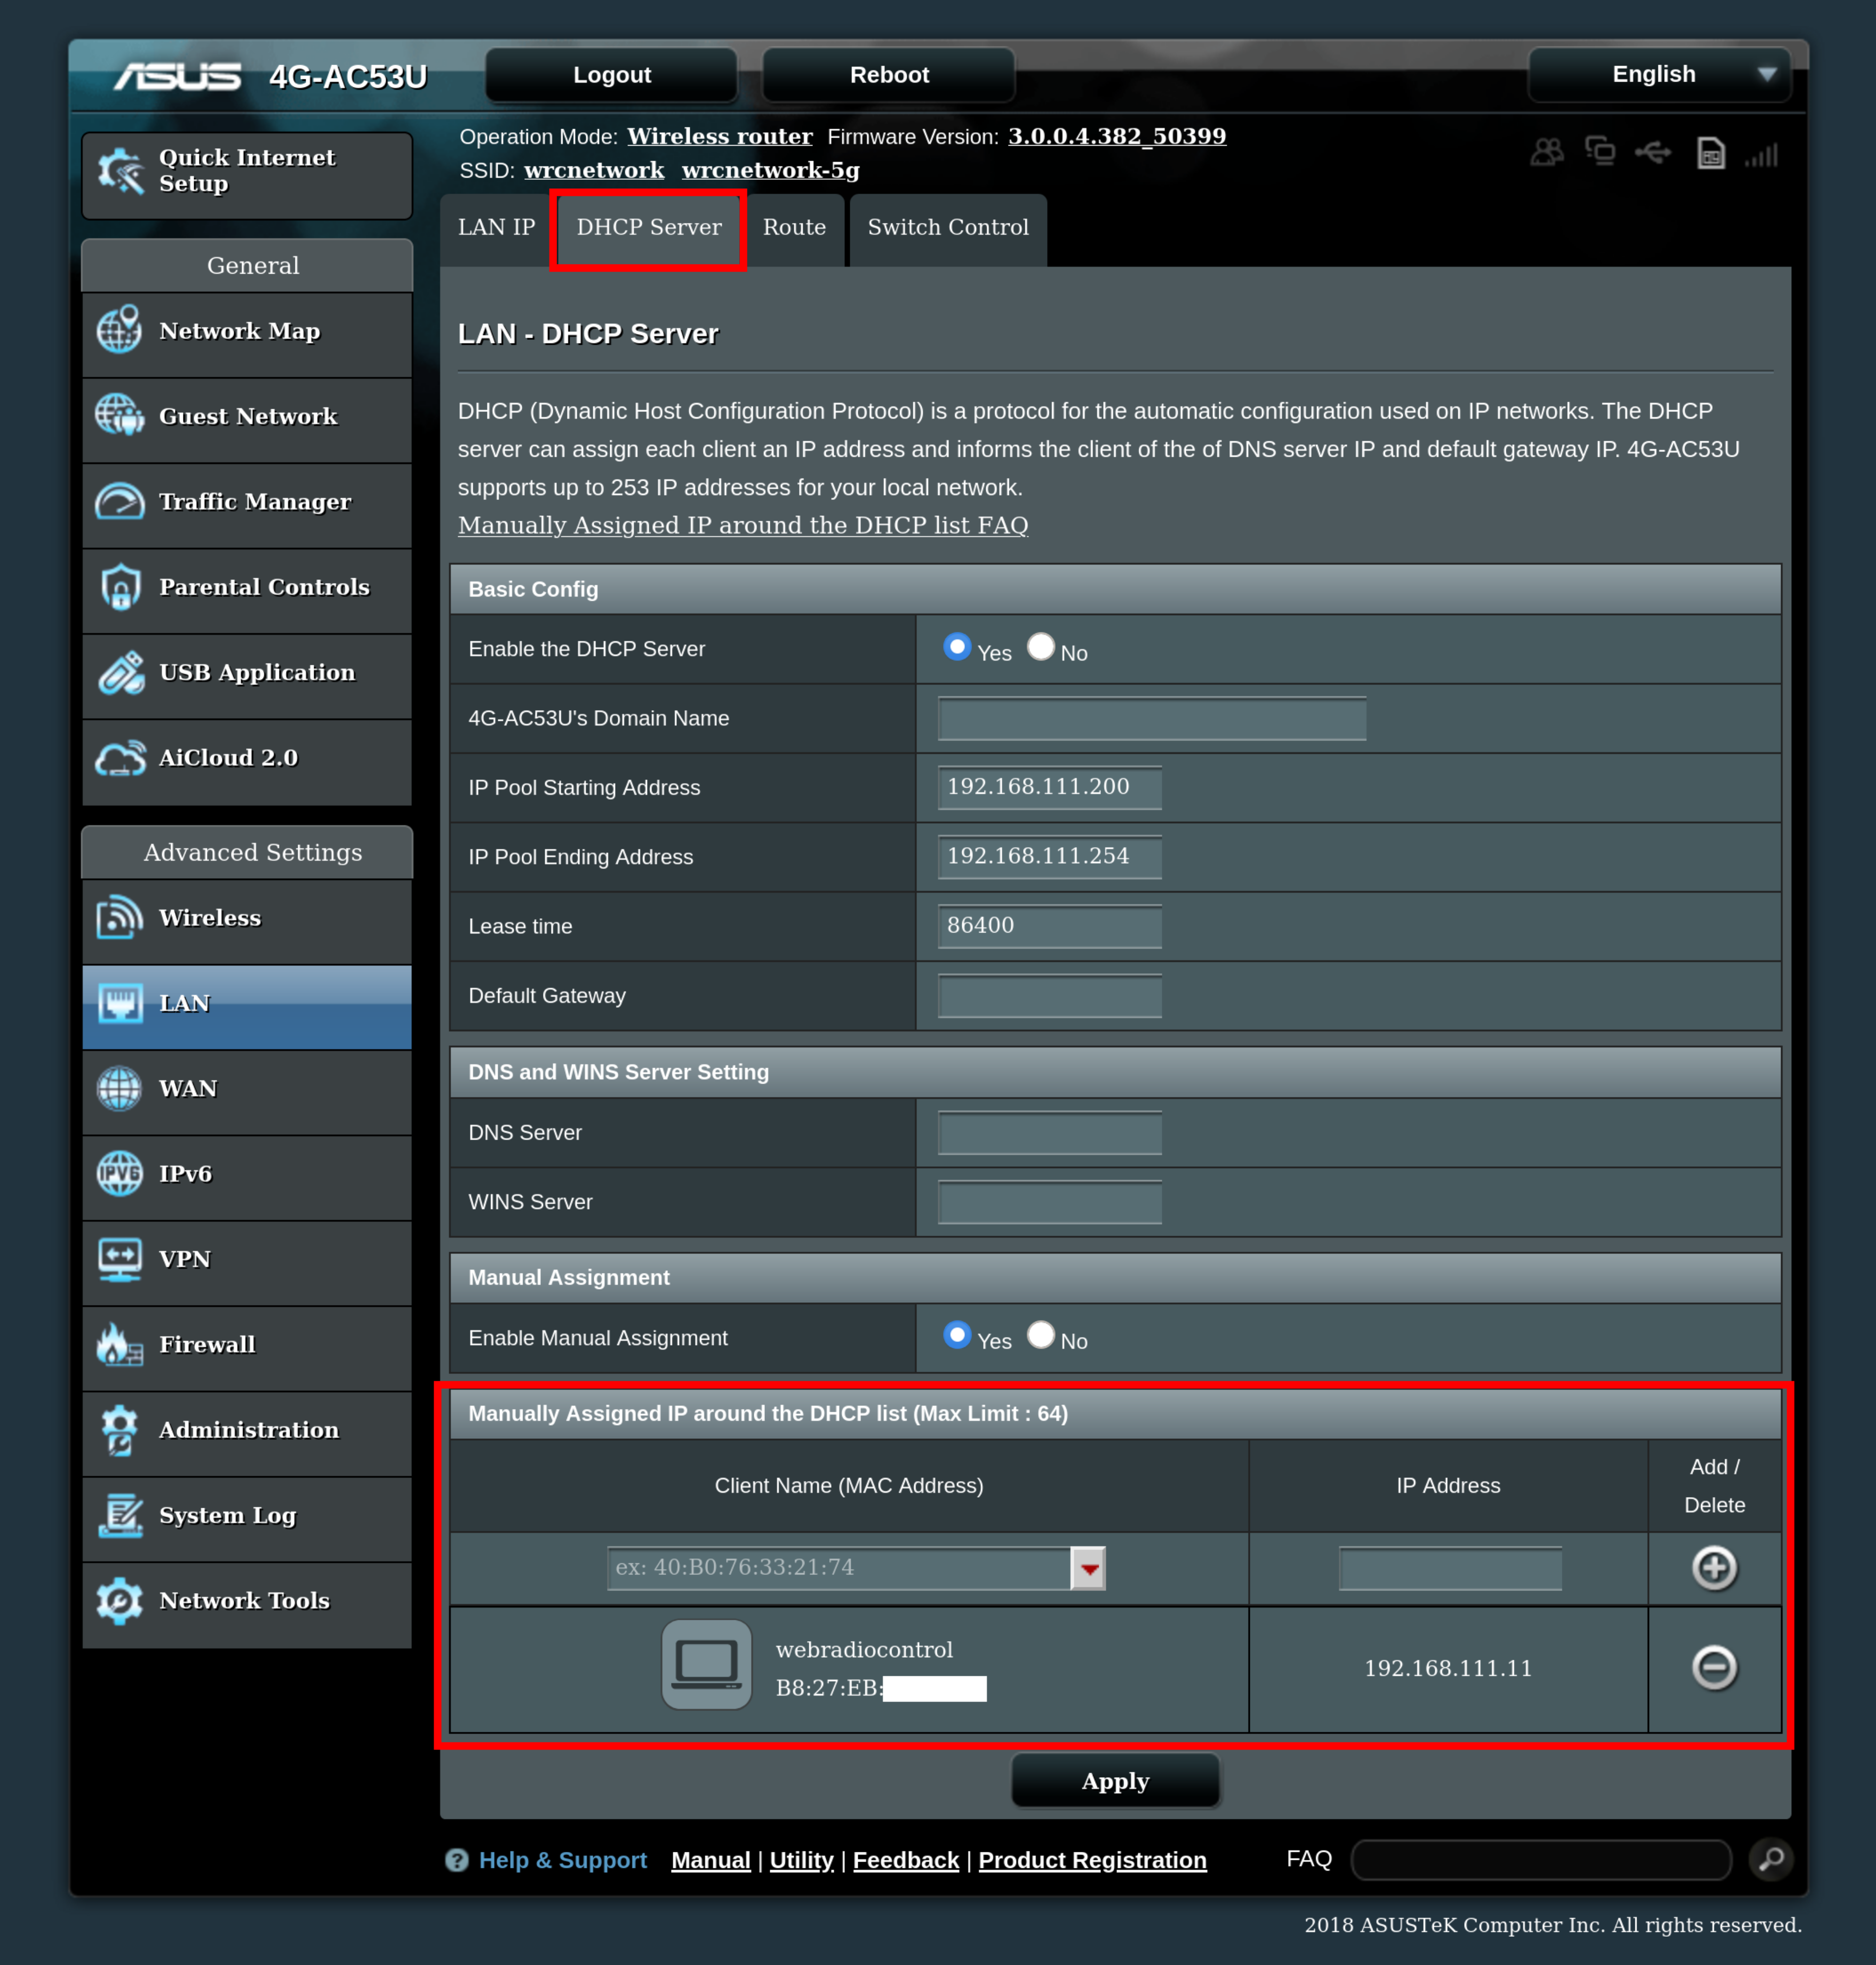
Create a DHCP reservation, which makes the Raspberry Pi IP address fixed, so that it will never change even if the Raspberry Pi computer is restarted.
-
Please refer to the user manual of your router/modem on how to do this
-
In order to create a DHCP reservation, most routers/modems will require you to enter the MAC address of the Raspberry Pi computer. A MAC address consists of 6 parts separated by colons (
:) and it looks like the following example:A1:B2:C3:D4:E5:F6. Again, most routers/modems list the MAC addresses of connected devices in the DHCP service settings. You may also see the local domain names of the devices in the management user interface. This domain name should bewebradiocontrol, which allows you to identify the correct MAC address in the list of devices. -
For additional information regarding creating DHCP reservations, see: https://uk.pcmag.com/news/124250/how-to-set-up-a-static-ip-address
-
-
Once you have created the DHCP reservation for the IP address, restart the Raspberry Pi computer by power cycling it. This is necessary to make Raspberry Pi use the new IP address reservation.
-
Verify that the Raspberry Pi computer uses the new IP address reservation by listing the IP addresses of the connected devices in the router/modem management user interface. You will need to wait for a moment to allow Raspberry Pi to start up properly.
Below is an example screenshot from Asus 4G modem management user interface for creating DHCP reservations:
Creating port forwarding settings (virtual server)
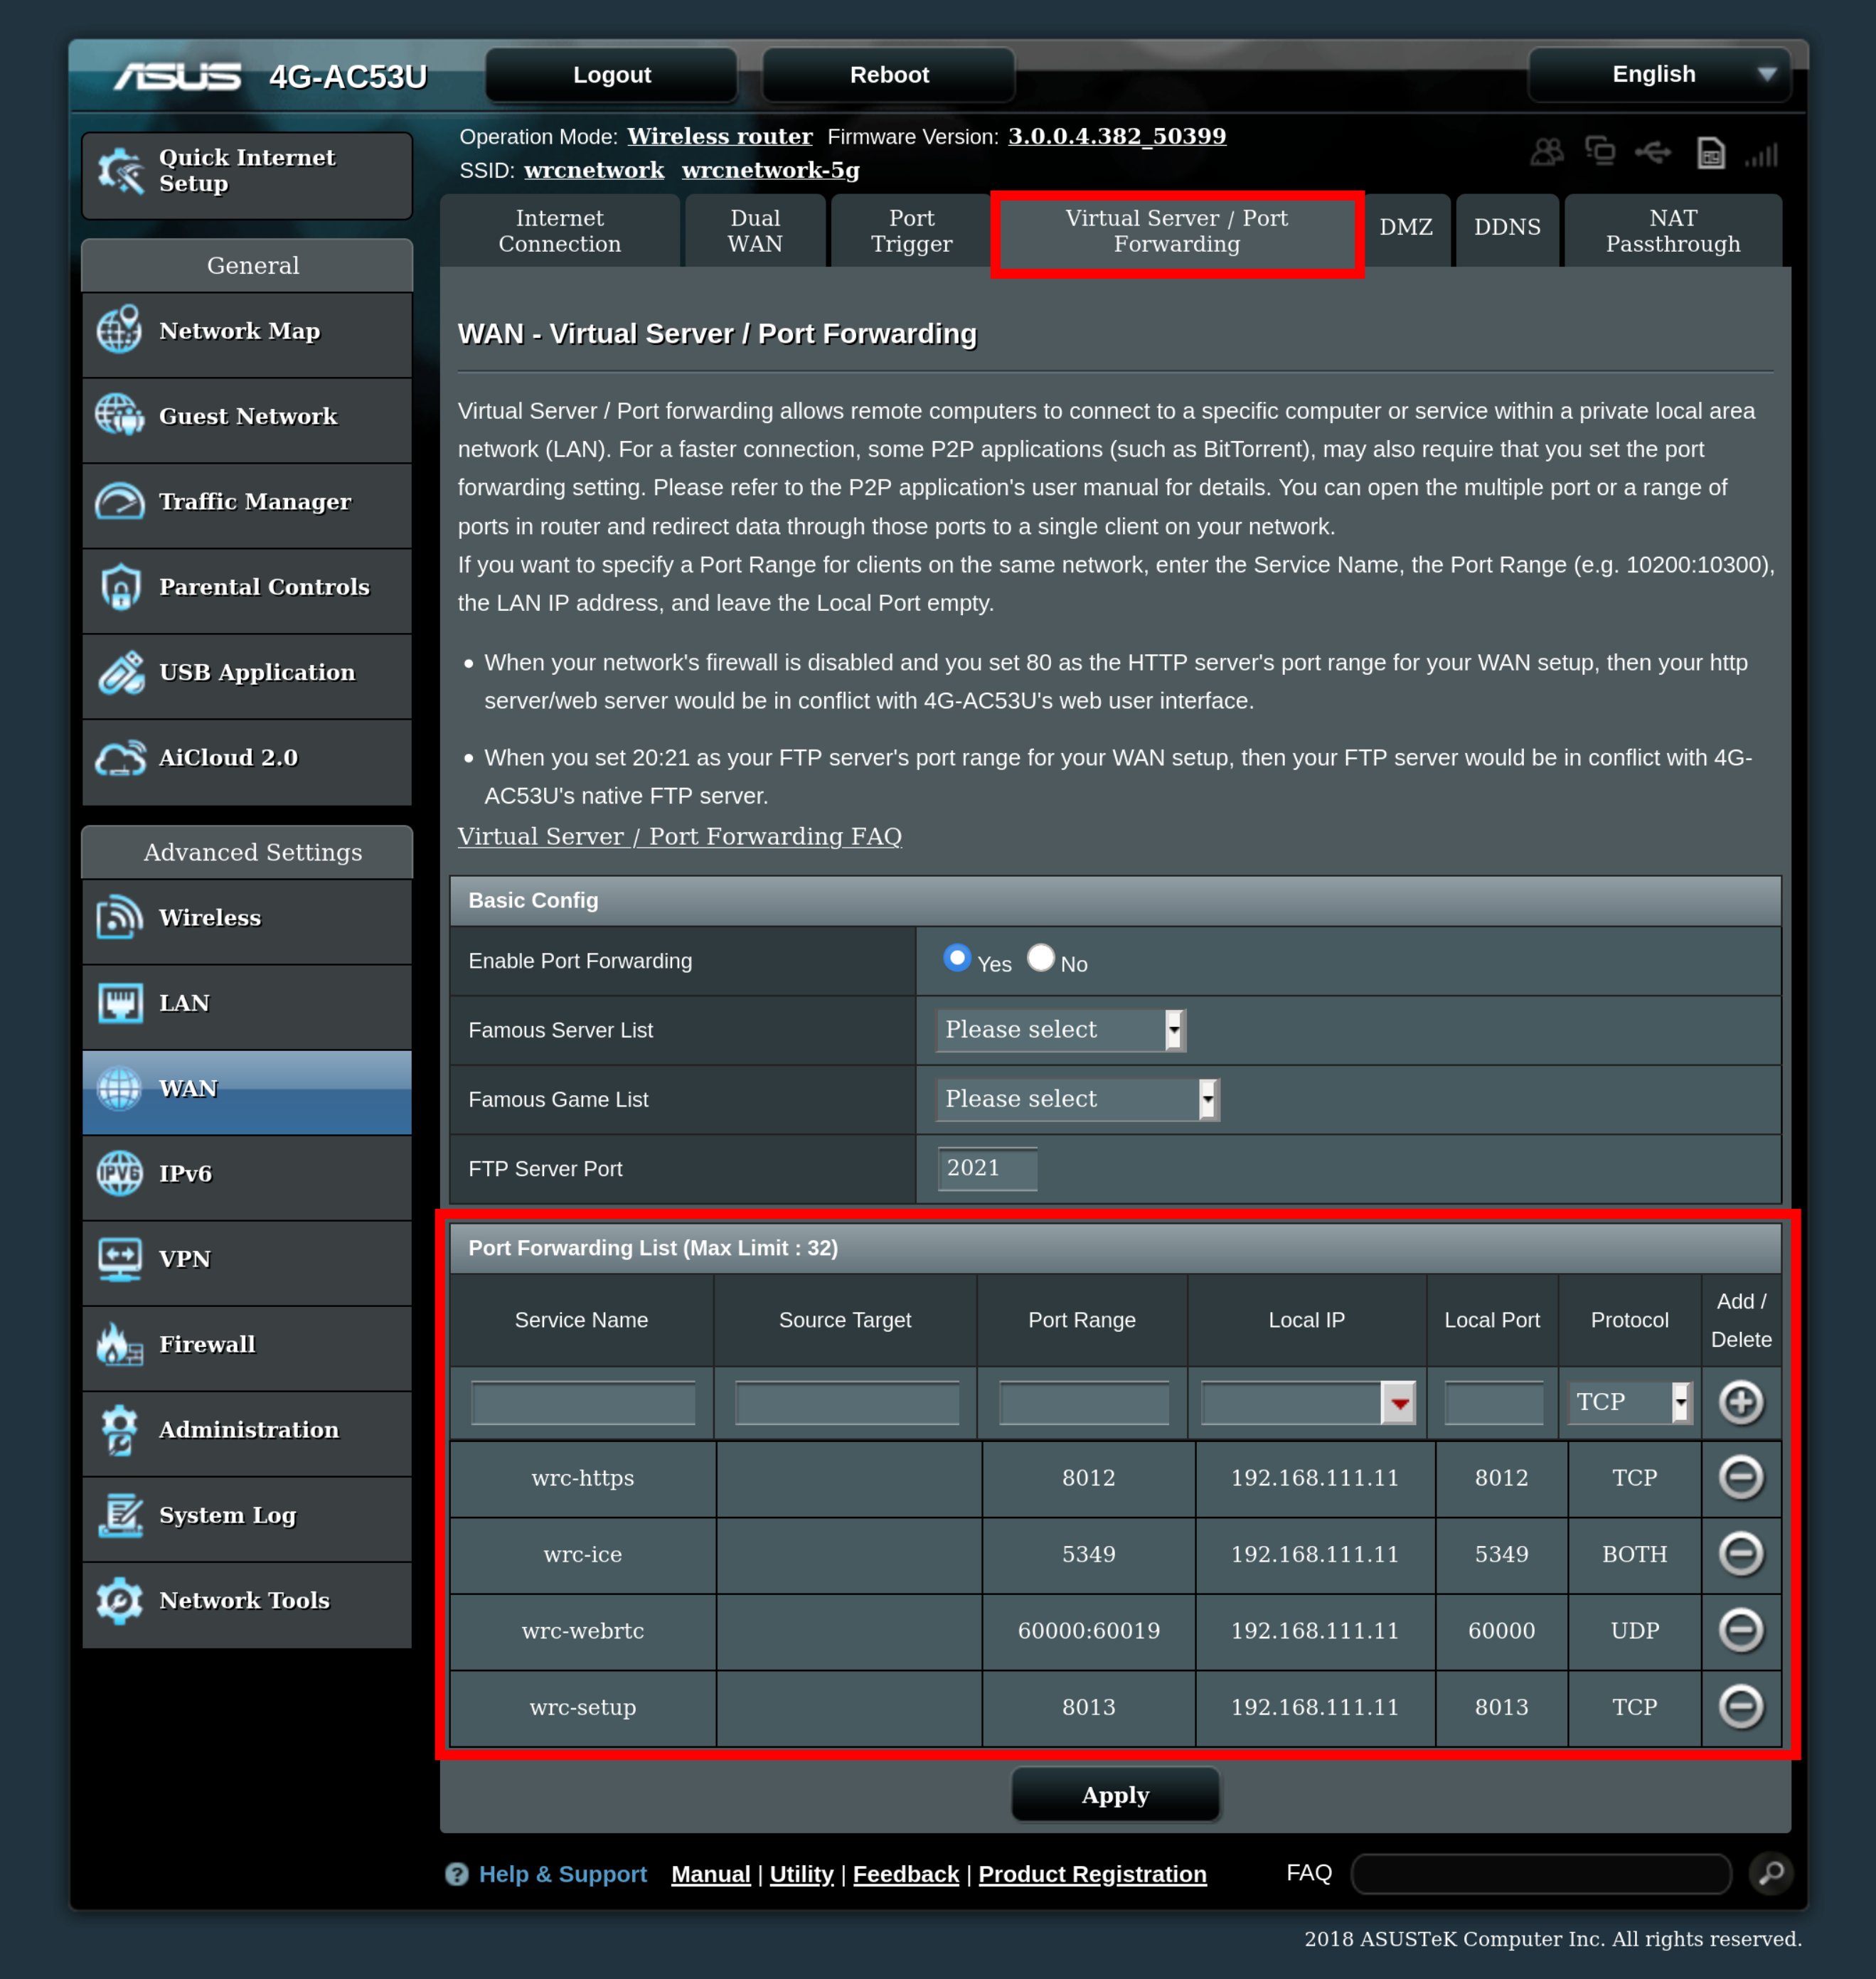
Use the router/modem management user interface to create the port forwarding settings required by Web Radio Control. The public port number of all port forwarding settings is always the same as the private Raspberry Pi port number.
Please refer to the user manual of your router/modem on how to do this. For additional information regarding creating port forwarding settings, see: https://www.noip.com/support/knowledgebase/general-port-forwarding-guide/.
Create the following port forwarding settings:
-
8012TCP - HTTPS server for the main remote control user interface of Web Radio Control -
8013TCP - HTTP server for the Web Radio Control setup user interface -
5349TCP and UDP - WebRTC audio ICE connection service -
60000-60019UDP - WebRTC audio transfer — NOTE: If the router/modem does not allow you to open this many ports or if it is not possible to open port ranges by specifying the start/end port numbers, the minimum number of open ports for audio transfer is four ports in the range60000-60003.
Below is an example screenshot from Asus 4G modem management user interface for creating port forwarding settings:
Allowing remote connections for troubleshooting purposes
NOTE: Do not allow SSH remote connectivity if you do not plan to use it, because the SSH connectivity may be a security risk in your local network. SSH connectivity is completely optional and is only useful for troubleshooting issues in use of Web Radio Control. You can skip this section if you do not need SSH connectivity.
Use the router/modem management user interface to create an additional port forwarding settings from public TCP port 2222 to Raspberry Pi IP address and port 22 (SSH). The SSH server is at least slightly hidden from unauthorized login attempts by using public port 2222.
In order to log in via SSH, you will need to use the default user credentials in the Web Radio control SD card image.
The user name is wrchost and the default password is wrc-image-password-change-me.
It is necessary to change the default password, so that you can prevent unauthorized use of the Raspberry Pi!
Log in to the Raspberry Pi Linux operating system using an SSH client, such as
PuTTY (for Windows), or a command-line tool
(via Terminal on Mac OS or Linux). You can use either the name webradiocontrol.local or the reserved local network IP address.
The port number for the SSH connection is always 22.
If you use the command-line SSH client, connect using the following command:
ssh wrchost@webradiocontrol.localAfter logging in, please change the user account password using passwd, which asks for the current and
the new password for the wrchost user. After changing the password, close the SSH connection using the command exit.
It is mandatory to change the password for the wrchost user in order to prevent unauthorized use of the Raspberry Pi!
Log in to the Raspberry Pi via an SSH connection using the default password and change the password according to the instructions above.
Obtaining a domain name
If you already have a domain name that has an IP address pointing to the Internet connection provided by your router/modem, you don’t need to obtain an additional domain name. You can simply use the existing domain name with Web Radio Control and skip this section.
It is recommended to obtain a domain name (e.g. a "web address", such as www.google.com), which you can use to
connect to your Web Radio Control server when using it via the public Internet. By using a domain name you don’t
have to use and remember long and complicated IP address numbers when accessing Web Radio Control, since you
can use the domain name you have obtained instead.
For this purpose you will need to obtain a DNS domain name, which will be configured to point to the public IP address of your router/modem. Web Radio Control does not require use of a static IP address, but it is easier to use a static IP address if you can obtain one from your Internet provider. In case of a static IP address, the domain name can always point to the same static IP address. However, most consumer-grade Internet connections, both wired and wireless (3G/4G/5G), provide only dynamic IP addresses, where the public IP address of the Internet connection changes from time to time. This is why it is likely that you will need to use a dynamic DNS service.
Dynamic DNS services offer an easy (and often a free) way to obtain a domain name. These services also allow you to keep the IP address of your domain name up-to-date if your Internet connection has a dynamic IP address (which changes)- It is also possible to use a dynamic DNS service with a static IP address. Follow the instructions below in order to start using a dynamic DNS service.
Obtaining a domain name using a dynamic DNS service
Follow these instructions if you need a new domain name for use with Web Radio Control. You can obtain a new domain name by using a dynamic DNS service. It is possible to use a dynamic DNS service with both dynamic and static IP addresses.
Web Radio Control supports the following dynamic DNS services:
If you don’t already have a user account for any dynamic DNS service, choose one of the services listed above and proceed to create a user account in the service. Write down the user name and the password of the account for later use. After creating the user account, register a new domain name to be used with Web Radio Control.
Write down the following details, because they are needed later in the Web Radio Control installation process:
-
The name of the dynamic DNS service you use
-
Your user name for the dynamic DNS service
-
The password for the dynamic DNS service user account
-
The domain name you registered in the dynamic DNS service
It is possible to use other dynamic DNS services too if the service in question provides IP address update API that supports HTTP GET requests.
In order to keep the IP address the chosen domain name points to up-to-date, you will need to set up an automated update routine that does this periodically. Web Radio Control provides this kind of update routine by monitoring the public IP address and sending updates to the dynamic DNS service if it notices that the public IP address changes.
You can find detailed instructions for configuring the dynamic DNS service update routine in Web Radio Control on this page about configuration. However, if you are performing first-time installation, please follow the configuration instructions from the very beginning.